Additional APIs for PaaS
There is a set of APIs that need to be integrated into the backend of your website. These APIs are responsible for operations for the user that intends to use NoPass™ passwordless authentication.
These operations include:
1. Registering your portal on the NoPass™ server
2. Registering a user on the NoPass™ server
3. Authenticating the user once they have been registered and each time they need to access your service
4. Deleting a user that no longer needs access to your service or decides to delete the NoPass™ authentication app.
To put it into contrast when the user opts to use NoPass™, your portal should perform the mentioned steps.
To integrate passwordless authentication support on your portal, you must create an additional API on the backend. One of the simple options for the implementation of these APIs will be shown based on a typical example (see ASP.NET Tutorial and ASP.NET Article ).
This example was modified to use passwordless authentication. The sequence of steps for performing each operation will be discussed based on the implementation of the needed methods. Only files, classes, and methods will be specified (if necessary). The specific preparation/processing of data in methods can be viewed in the source code. The task is only to show the sequence of calls for a better understanding of the interaction between the portal and the NoPass™ server.
A finished example can be found here (read the comments for the example)
https://github.com/identite/nopass.api
1. PORTAL REGISTRATION
Description
Let's combine the description of the portal registration and the sequence of calls to the corresponding API methods on the user portal.
To register any type of the NoPass™ portal, you need the Admin login and S-code.
Mind the following restrictions for the credentials:
- Admin login (AdminId): length is less than 64 case-sensitive characters.
- S-code (Password): length is a minimum of 8 characters including capital letters and numbers or symbols.
For example:
AdminId: nopassadmin
S-code: 0B43ACAF37AF4F8183B2DDD482837E91
Procedure
The registration process of the portal is as follows:
1. On the portal registration page ( https://nopass.identite.us/ ), fill in the following fields:
• In Portal type, select Portal
• In the Web URL, enter the URL of the Web portal you want to register in the NoPass™ system
• In Portal name, enter the name of your portal.
• In Admin login, enter the login name
• In S-code, enter the secret key
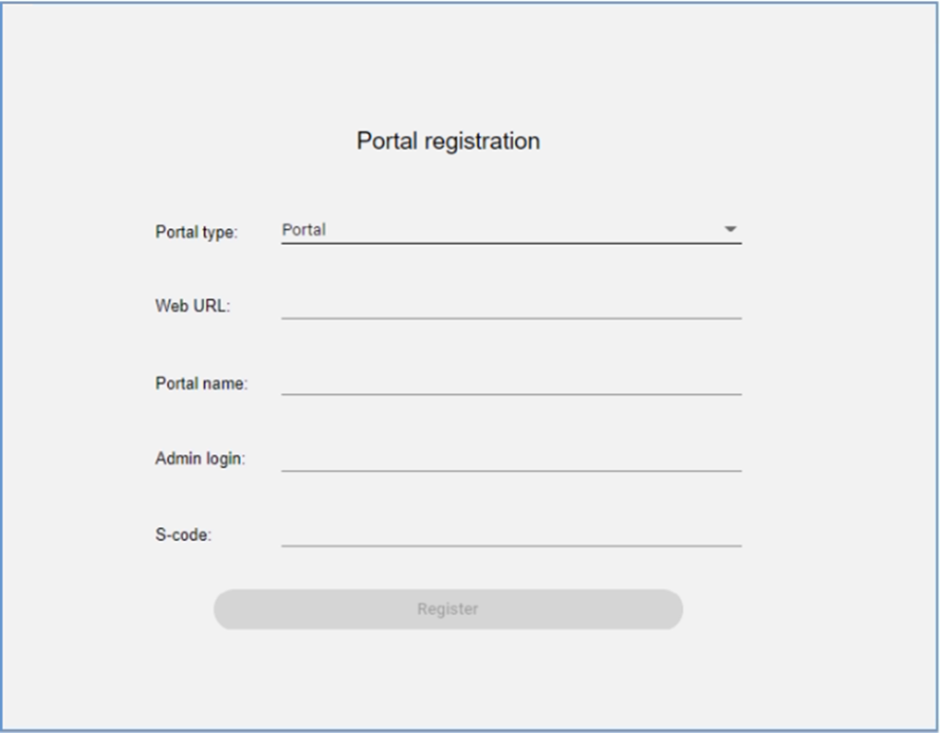
2. Click the Register button. NoPass™ server sends a request to the user portal API “~/api/PortalCommunication/ConfirmPreRegistration”
Example:
https://your.portal.com/api/PortalCommunication/ConfirmPreRegistration
It is used to verify whether the admin login is correct.
3. This request is processed in the "PortalCommunicationController.cs” file, the “ConfirmPreRegistration” method (see 1. CONFIRM PORTAL PREREGISTRATION section in the NoPass™ API Integration ). The necessary checks are made and the output is generated in this place.
4. On the admin portal settings page, paste/import the license code that you have received from the Identité™ team earlier.
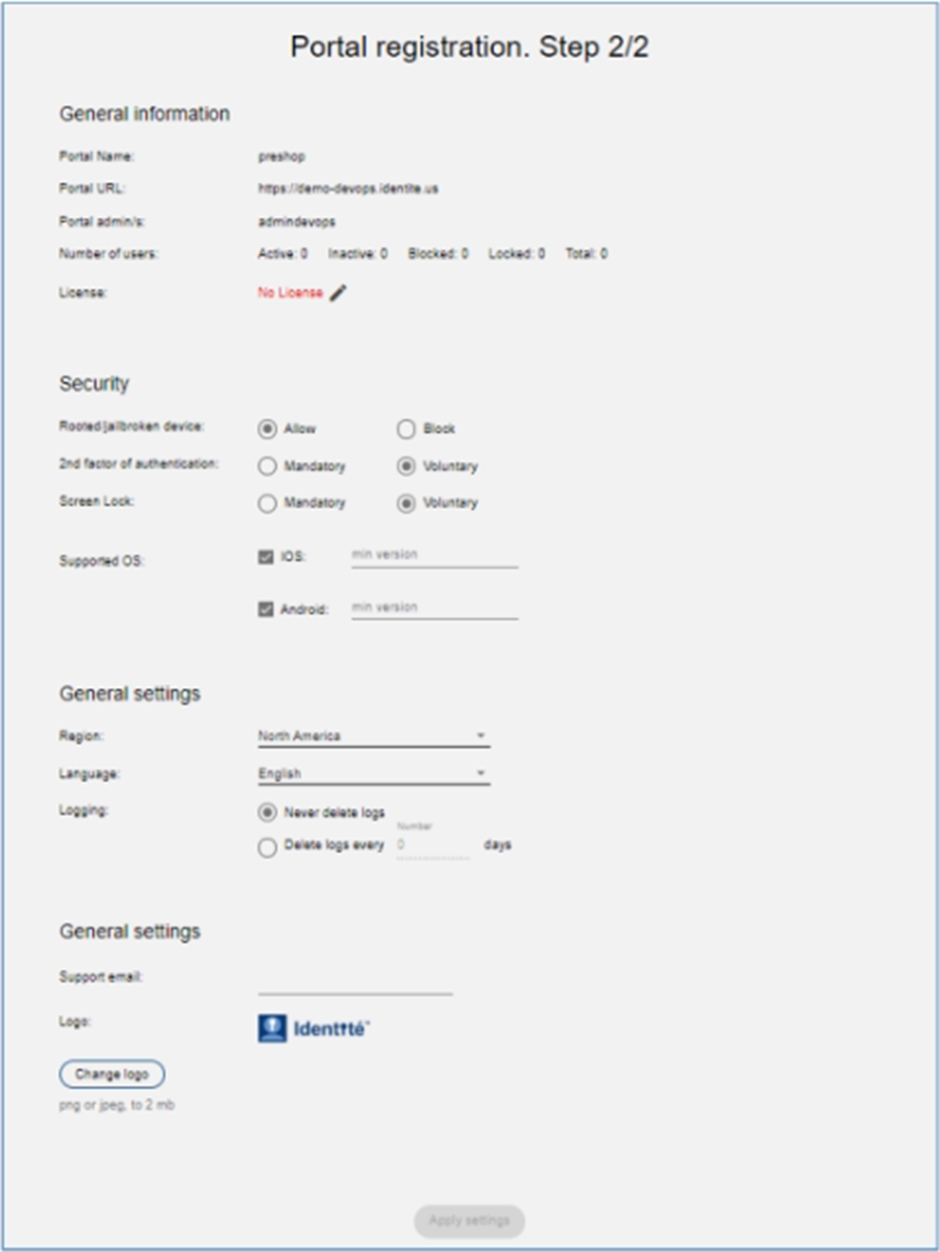
5. Customize the following settings, and click Apply Settings:
• General information – information created in Step 2. The license information is available after entering or importing to this page.
• Security - can be triggered or manipulated by admin for all users using our authentication system to access your services.
• General settings - information on your Admin Panel
6. A successful result is as follows:
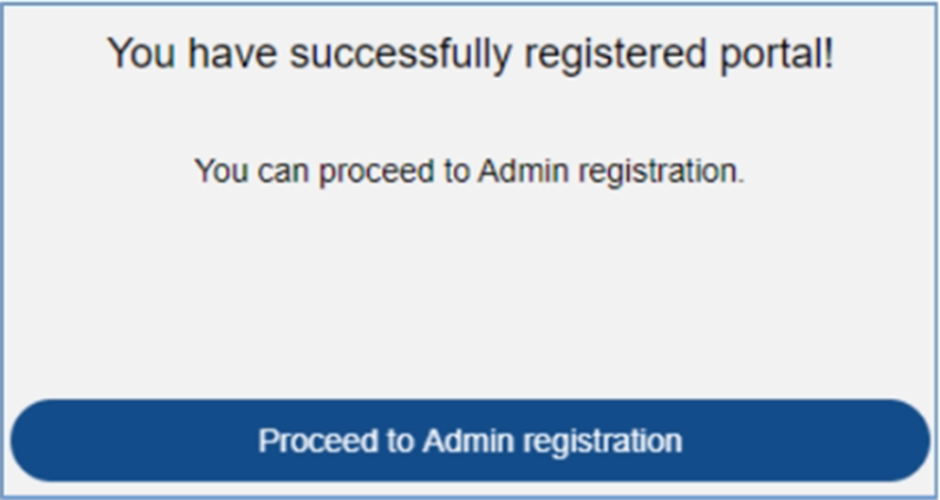
Also, the NoPass™ server sends a request to the user portal API “~/api/PortalCommunication/ConfirmRegistration”
Example:
https://your.portal.com/api/PortalCommunication/ConfirmRegistration
This method is called after the administrator has finished registering for NoPass™.
7. This request is processed in the “PortalCommunicationController.cs” file, “ConfirmRegistration” method (see 2. CONFIRM PORTAL REGISTRATION section in the NoPass™ API Integration ). Registration information of the portal is saved here and will be used next time in requests or checking of responses data.
2. NOPASS USER REGISTRATION
Description
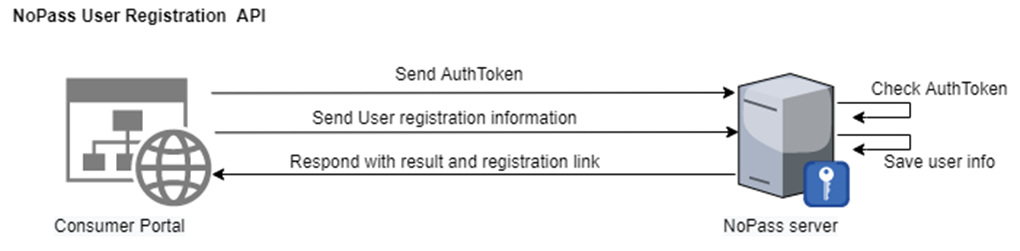
When a user decides to use NoPass™ as a passwordless authentication, the first step is to register on the NoPass™ server, the following steps should be performed by your portal once the user chooses to register on NoPass™.

Procedure
When the user chooses to register on the NoPass™ system,
1. The portal must send a POST request to the NoPass™ server to start the registration process. The response to this request will provide the necessary information that will be used later to add the user's information into the NoPass™ server. See the “RegisterNoPass.cshtml.cs” file, “RegisterNoPassModel” class.
URL
NoPass_server_api/api/UserRegistration/PreRegisterUser
Request
- Content Type
application/json-patch+json
- Authentication
Bearer%AuthToken%
//authToken is received from the server during registration (see description for /api/PortalCommunication/ConfirmRegistration endpoint for details).
|
Parameter |
Type |
Restriction |
Length |
Description |
|---|---|---|---|---|
|
authToken |
string |
|
<=256 |
This value comes from the NoPass™ server and is assigned to your portal. Save this value, it will be used to authenticate requests against Server API with a bearer scheme. |
- Body
{
"portalId": "string",
"userId": "string",
"clientIP": "string",
"redirectUrl": "string",
"socialNetwork": "string",
"Data": {
"givenName": "string",
"surName": "string",
"phoneNumber": "string",
"email": "string"
}
}
|
Parameter |
Type |
Length |
Description |
|---|---|---|---|
|
portalID |
string |
<=256 |
A unique identification number assigned to an individual portal by the authentication server. This value comes from the NoPass™ server and is assigned to your portal. Save this value, it will be used in registration/authentication of users by NoPass™ on your website. |
|
userId |
string |
<=36 |
This is the user’s ID (user’s login name) The user login will be used for logging in. This field should be empty in case the registration is happening via a social network. |
|
clientIP |
string |
|
It is a valid remote IP address of the client machine. |
|
redirectUrl |
string |
|
An absolute URL to which the user should be redirected back after the registration on NoPass™ is completed. (like your website landing page or accounts page) |
|
socialNetwork |
string |
|
The name of a social network from which the registration may proceed. Google and Facebook are supported as of now. This field should be empty in case registration is happening directly and without the help of a social network. |
|
data |
|
|
Additional information about the user. Skip this step if the registration via social network is chosen. |
|
givenName |
string |
<=2084 |
First name of the registering user |
| surName |
string |
<=2084 |
Last name of the registering user |
|
phoneNumber |
string |
<=2084 |
Phone number of the registering user |
|
|
string |
<=2084 |
Email of the registering user |
Response
- Response code
|
Response |
Meaning |
|---|---|
|
200 |
Success |
Anything other than 200 means something was wrong with the parameters during validation
- Response format
Text/Plain
- Response body
{
"errors": [
{
"code": "string",
"message": "string"
}
],
"result": {
"otp": "string",
"registerLink": "string"
}
}
|
Parameter |
Type |
Length |
Description |
|---|---|---|---|
|
errors |
array |
|
List of errors. Empty if there are no errors.
|
|
code |
string |
<=64 |
Code of error.
|
|
message |
string |
<=2084 |
Message about what’s wrong. |
|
result |
string |
|
Result of the process |
|
otp |
|
|
This is a parameter with random characters. It is a secure random generated value used to validate the user registration. Upon registration, the portal will be asked to add this registration code to some requests. |
|
registerLink |
string |
<=2084 |
Link that directs to the installation of the application. The user should be redirected to this link.
|
- Example
2. The successful response to this request will provide the information that will be used later to add the user's information. After the necessary information is saved, we should do a redirect to a URL that can be received from the RegisterLink (see “RegisterNoPass.cshtml.cs” file, “RegisterNoPassModel” class).
3. The NoPass™ server sends a request to the user portal API “~/api/PortalCommunication/ConfirmUserRegistration”
Example:
This method is called when the user has registered on the system.
4. This request is processed in the "PortalCommunicationController.cs” file, “ConfirmUserRegistration” method (see 5. CONFIRM USER REGISTRATION section in the NoPass™ API Integration). The necessary checks are made and the output is generated in this place. If the OTP is in registrationNoPassService and the user is not in the database, then the new user is saved.
5. As a result of a redirect to the “ExternalLogin” page (“ExternalLoginModel” class. The redirect was executed in the “RegisterNoPassModel” class), make sure that the user was confirmed in API ConfirmUserRegistration before. If everything is ok, you log in and get redirected to the Home page.
3. NOPASS USER AUTHENTICATION
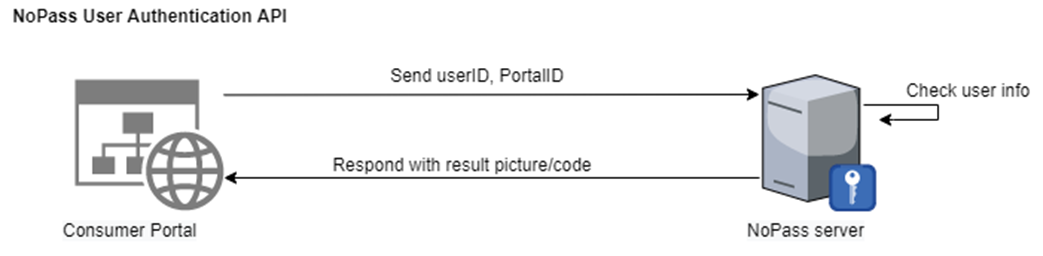
Description
When a user decides to authenticate into your service via NoPass™ passwordless authentication, your portal (website) should perform the following steps. And the following method should be called when attempting the user authorization.

Procedure
When a user decides to authenticate into your portal via NoPass™passwordless authentication, your portal (website) should perform the following steps (below you can see the steps that are performed in the sample):
1. In the “LoginNoPasssModel” class (“LoginNoPasss.cshtml.cs” file), it is checked whether such a NoPass™ user exists. If the user is found, then execute redirect to the picture display page (“ConfirmPictureModel” class, “ConfirmPicture.cshtml.cs” file).
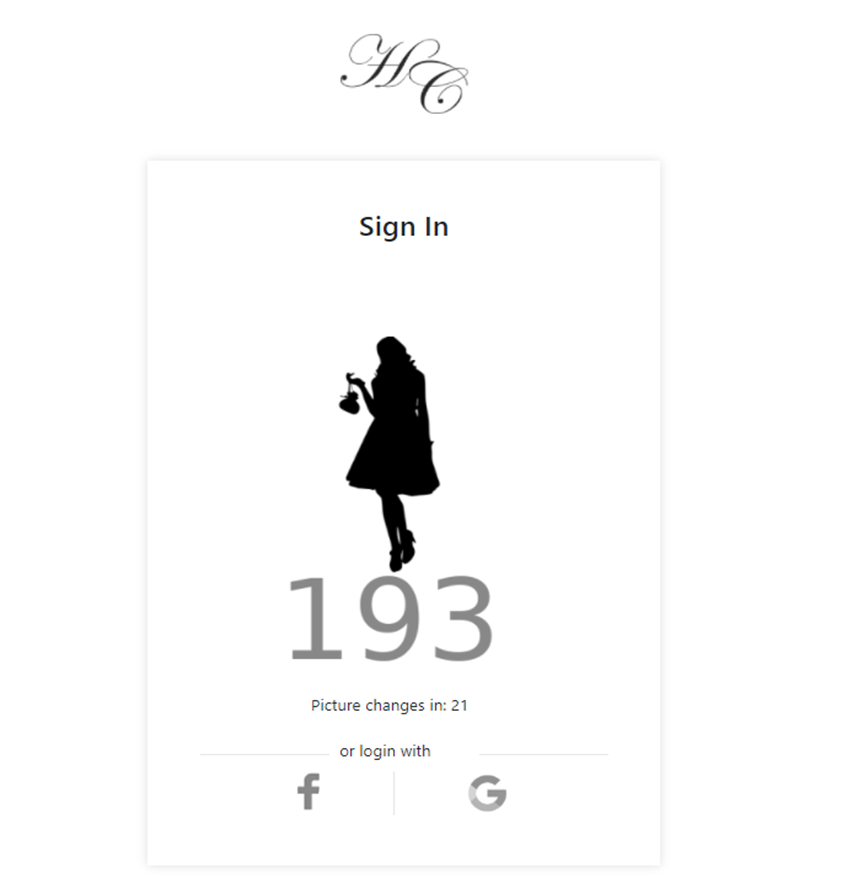
2. In the “ConfirmPictureModel” class, we prepare the data and send a POST request to the NoPass™ server to start the authentication process.
URL
NoPass_server_api/api/UserAuthentication/RequestAuthorization
Request
- Content Type
application/json-patch+json
- Body
{
"portalId": "string",
"userId": "string",
"Social": "int"
}
|
Parameter |
Type |
Length |
Description |
|---|---|---|---|
|
portalID |
string |
<=256 |
A unique identification number assigned to an individual portal by the authentication server. This value comes from the NoPass™ server and is assigned to your portal. Save this value, it will be used in registration/authentication of users by NoPass™ on your website. |
|
userId |
string |
<=36 |
This is the user’s ID (user’s login name) The user login will be used for logging into your portal (website).
|
|
social |
int |
optional |
This parameter is not required. It defines what type of social network should be used to authenticate users. 0=Google 1=Facebook |
Response
- Response code
|
Response |
Meaning |
|---|---|
|
200 |
Success |
Anything other than 200 means something was wrong with the parameters during validation
- Response format
Text/Plain
- Response body
{
"errors": [
{
"code": "string",
"message": "string"
}
],
"result": {
"authId": "string",
"image": "string",
"nextChange": "int",
"loginUrl": "string"
}
}
|
Parameter |
Type |
Length |
Description |
|---|---|---|---|
|
errors |
array |
|
List of errors. Empty if there are no errors.
|
|
code |
string |
<=64 |
Code of error.
|
|
message |
string |
<=2084 |
Message about what’s wrong. |
|
result |
|
|
Result of the process |
|
authId |
string |
|
Identification string of the current authentication session provided by the NoPass™ server. Correlate this value with this login session for this user and remember. |
|
image |
string |
8 - bit (PNG-8) PNG file Coded in base64 format |
This picture/code should be shown on your website's login page so that the user can compare it with the image/code generated on their NoPass™ mobile app. |
|
nextChange |
integer |
In milliseconds |
It is the time period in milliseconds, where the picture will be changed. Can be used to show a countdown indicator. |
|
loginUrl |
string |
|
Link to be used to authenticate users against social networks. |
- Example
https://nopass.company.com/api/UserAuthentication/RequestAuthorization
If the response to this request is OK, then save authentication user information (which will be needed later for correlating the authentication information with the user) and draw picture/code on this page (“ConfirmPictureModel” class).
3. NoPass™ server sends a request (several requests in the common case) to the user portal API “~/api/PortalCommunication/UpdatePicture”:
Example:
https://your.portal.com/api/PortalCommunication/UpdatePicture
This method is called when the images received from the NoPass™ system in the process of authorization are updated.
4. This request is processed in the “PortalCommunicationController.cs” file, “UpdatePicture” method (see 3. Update Picture/Code section in the NoPass™ API Integration ). If there is a loginNoPassModel, then send new data (picture and code) to the frontend in SignalR.
5. NoPass™ server sends a request to the user portal API “~/api/PortalCommunication/AuthorizedUser” to inform you about finalized authorization.
Example:
https://your.portal.com/api/PortalCommunication/AuthorizedUser
6. This request is processed in the “PortalCommunicationController.cs” file, “AuthorizedUser” method (see 6. Authorized User section in the NoPass™ API Integration ).
If authorization is successful, then we save the data and send it to the page (client) to redirect to the page “ExternalLoginSignalRModel” class
Example:
https://your.portal.com/Identity/Account/ExternalLoginSignalR
If the image expiration time runs out and no information about the finalized authorization is received, the user should be informed about it. You can inform the user immediately or set some time, which you can wait for information to arrive (updated picture or authentication status) from the NoPass™ system.
7. As a result of a redirect to the “ExternalLoginSignalR” page (“ExternalLoginSignalRModel” class), make sure that everything is OK, do login and a redirect to the Home page.
4. NOPASS USER DELETION
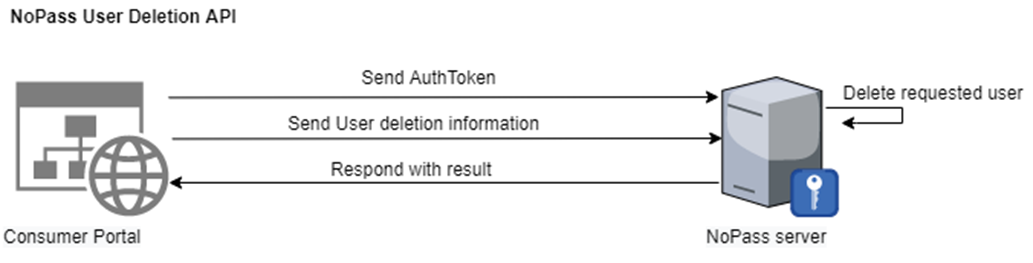
Description
When the user chooses to delete an account from the NoPass™ system, the portal should do the following:
Procedure
1. The portal must send a POST request to the NoPass™ server to start deletion.

URL
NoPass_server_api/api/UserDelete/DeleteInitialPortal
Request
- Content Type
application/json-patch+json
- Authentication
Bearer %AuthToken%
//authToken is received from the server during registration (see description for /api/PortalCommunication/ConfirmRegistration endpoint for details).
|
Parameter |
Type |
Restriction |
Length |
Description |
|---|---|---|---|---|
|
authToken |
string |
|
<=256 |
This value comes from the NoPass™server and is assigned to your portal. Save this value, it will be used to authenticate requests against Server API with a bearer scheme. |
- Body (NS: )
{
"portalId": "string",
"userId": "string"
}
|
Parameter |
Type |
Length |
Description |
|---|---|---|---|
|
portalID |
string |
<=256 |
A unique identification number assigned to an individual portal by the authentication server. This value comes from the NoPass™ server and is assigned to your portal. Save this value, it will be used in registration/authentication of users by NoPass™ on your website. |
|
userId |
string |
<=36 |
This is the user’s ID (user’s login name) The user login will be used for logging in. This field should be empty in case the registration is happening via a social network. |
Response
- Response code
|
Response |
Meaning |
|---|---|
|
200 |
Success |
Anything other than 200 means something was wrong with the parameters during validation
- Response format
Text/Plain
- Response body
{
"errors": [
{
"code": "string",
"message": "string"
}
],
"result": "string"
}
|
Parameter |
Type |
Length |
Description |
|---|---|---|---|
|
errors |
array |
|
List of errors. Empty if there are no errors.
|
|
code |
string |
<=64 |
Code of error.
|
|
message |
string |
<=2084 |
Message about what’s wrong. |
|
result |
string |
The |
ID of deletion session. |
- Example
https://nopass.company.com/api/UserDelete/DeleteInitialPortal
2. Before sending a response (POST request in item 1) the NoPass™ system calls portal API “~/api/PortalCommunication/DeleteUser” to indicate that the user account in NoPass™ was deleted.
Example:
https://your.portal.com/api/PortalCommunication/DeleteUser
3. This request is processed in the “PortalCommunicationController.cs” file, “DeleteUser” method (see 8. DELETE USER section in NoPass™ API Integration ). If everything is OK, then we delete the NoPass™ user.
4. We process the response of our request to the server (see step 1, “NoPass_server_api/api/UserDelete/DeleteInitialPortal” request). The user should already be deleted if the portal API worked without errors.
5. close authentication session
Description
When the user chooses to log out from the NoPass™ system, the portal should do the following:
Procedure
1. The portal must send a POST request to the NoPass™ server to close the session.
URL
NoPass_server_api/api/UserAuthentication/CloseAuthSession
Request
- Content Type
application/json-patch+json
- Body
{
"portalId": "string",
"authId": "string",
}
|
Parameter |
Type |
Length |
Description |
|---|---|---|---|
|
portalID |
string |
<=256 |
A unique identification number assigned to an individual portal by the authentication server. This value comes from the NoPass™ server and is assigned to your portal. Save this value, it will be used in registration/authentication of users by NoPass™ on your website. |
| authId | string |
Identification string of the current authentication session provided by the NoPass™ server. Correlate this value with this login session for this user and remember. |
Response
- Response code
|
Response |
Meaning |
|---|---|
|
200 |
Success |
Anything other than 200 means something was wrong with the parameters during validation
- Response format
Text/Plain
- Response body
{
"errors": [
{
"code": "string",
"message": "string"
}
],
"result":"string"
}
|
Parameter |
Type |
Length |
Description |
|---|---|---|---|
|
errors |
array |
|
List of errors. Empty if there are no errors.
|
|
code |
string |
<=64 |
Code of error.
|
|
message |
string |
<=2084 |
Message about what’s wro ng. |
|
result |
string |
|
|
- Example
https://NoPass_server_api/api/UserAuthentication/CloseAuthSession
next topic: Additional APIs for SaaS
previous topic: NoPass™ API Integration